
Different seals are used in engines to keep fluids contained. The valve cover gasket is one of the most important engine seals. It helps maintain proper engine lubrication and controls the potential for messy, unsafe oil leaks. With time and heat, valve cover gaskets can fail. Knowing how the sequence works will help prevent costly repair bills.
This complete guide contains a wealth of information regarding the basic function of a valve cover gasket, along with detailed instructions on replacing a valve cover gasket.

Every modern internal combustion engine has a cylinder head. This structure contains the valves, camshafts, and lifters. Engine oil is kept in, and these moving parts are protected by a metal or plastic lid called a valve cover that is bolted over the cylinder head.
The valve cover gasket is a thin strip of rubber, cork, or silicone that sits directly between the valve cover and the cylinder head. This creates a full airtight and fluid-tight seal to prevent the oil splashing around to lubricate the valvetrain from escaping into the engine bay.
Engine oil is under pressure and exposed to high temperatures. If the gasket is not working correctly, the oil will leak out of the engine block almost instantaneously.
Once the oil leaks out, it can cover the outside of your car engine. It works as a heat insulator, making the engine hot and beyond the usual temperature. Besides, it also wears out the rubber hoses and the electrical wiring insulation over time.
Oil leaking from a bad seal is most dangerous when it drips on hot exhaust components. It is well known that exhaust manifolds get hot enough to set fire to engine oil, and that is a very serious fire hazard for a car.

Identifying the symptoms of a damaged seal is the best way to fix the issue early before it causes heavy engine damage and breakdown.
Some overhead cam engine designs (OHC) use long tubes that go through the valve cover to hold the spark plug.
Tube seals are circular rings installed on the spark plug tubes to keep the oil from filling up in the spark plug wells. They usually come with a full set of valve cover gaskets.
If the tube seals are broken, then the spark plug well will fill up with oil. Since oil conducts electricity, it will cause a short between the spark plug wire and the ignition coil and will stop the spark plug from firing. This will light up the check engine light because of a misfire code.

Replacing a valve cover gasket is an ideal project for someone who is just starting as a do-it-yourself mechanic. Four-cylinder engines have access to the upper part of the engine without difficulty.
Allow the engine time to cool before proceeding. Disconnect the negative terminal of the battery in order to eliminate risk of electrical shock. Remove any plastic covers, pipes, or brackets that might be getting in the way of removing the valve cover.
Gently unplug the wire harnesses going to the ignition coils. Remove the ignition coils or spark plug wires to fix them as necessary, so they can be reconnected later to their correct cylinder location. Unplug the PCV breather hoses connected to the cover.
Using a socket wrench, loosen all of the valve cover bolts in reverse spiral order to avoid distorting the valve cover shape. Then gently remove the valve cover from your engine.
Clean the aluminum mating surface of your cylinder head using a plastic scraper to remove any old, hardened gaskets that may have been installed before this installation. Avoid using any type of metal scraper. Be sure to clean the two surfaces using brake cleaner and a clean, lint-free rag.
Thoroughly clean the valve cover groove with a wire brush to remove all dirt and debris before pushing the new rubber gasket all the way into the groove so that it lies flat with no distortion at all. If applicable, press the new spark plug tube seals into position.
Use a tiny dot of RTV silicone sealant for high temperatures at the sharp corners or seams of the timing chain cover and cylinder head. Allow it to cure for a few minutes until it becomes tacky.
Place the valve cover back onto the engine without dropping it. When reinstalling bolts, do so with your fingers to prevent cross-threading. Consult your vehicle’s specific torque pattern and torque specifications. Follow the recommended crisscross pattern for proper bolt torque distribution.
Put the ignition coils, spark plug wires, electrical connectors, and vacuum hoses back on the engine. Reconnect the battery terminal and start the engine. Allow the engine to warm up at idle and check along the perimeter of the cover for any signs of escaping fluid.
The price for this repair can differ quite a bit depending on whether you do it yourself versus taking it to a repair shop.
If you do the work yourself, it is very inexpensive. A good replacement gasket set from a known manufacturer will cost about $10-$40 USD depending on your vehicle make and engine size.
The part price will stay low, although the hourly labor charge will be $50-$150 USD.
A leaking valve cover gasket may initially be seen as a minor inconvenience but can develop into a serious safety risk or costly engine damage if not addressed quickly. Getting this repair done early will help you maintain the health of your car and keep your engine lubricated for many more miles.

The LBZ Duramax is considered to be one of the most legendary engines in the diesel pickup truck world. Even though it was produced for such a short time, it is referred to by many as the “Holy Grail” of GM diesel engines.
If you’re looking to purchase a used Chevrolet Silverado or GMC Sierra, knowing the LBZ Duramax engine year can help you obtain an excellent used truck that is pre-emission and a strong, reliable performer.
This complete guide will provide you with all the information you need to know about this famous engine.
The LBZ Duramax was produced for only two model years, which were 2006 and 2007. The LBZ was introduced in late 2005 for 2006. It was the replacement for the ill-fated LLY generation.
Production ended midway through the 2007 model year when the new LMM generation commenced production to meet increasingly stringent federal emissions regulations. Because of the short production run, trucks equipped with the true LBZ engine are rare, very desirable, and provide a greater resale value than nearly every other diesel truck.

The primary reason for diesel enthusiasts to stockpile LBZ trucks is straightforward: it embodies the pinnacle of Duramax horsepower before the imposition of sophisticated emissions controls by governmental legislation.
GM was legally mandated to install DPFs starting with the LMM series in mid-2007. It has added DEF systems since that time.
While these technologies are intended to minimise environmental impact, they also substantially limit exhaust flow, reduce fuel efficiency, and create numerous high-cost failure points. The LBZ only has a relatively simple EGR system and catalytic converter, resulting in no restrictions on the exhaust system.
GM didn’t merely ignore the emission control systems; they redesigned the entire 6.6L engine structure, from the old LLY Engine block to the LBZ Engine block. LBZ Engine block changes are:
2006 saw an enormous milestone in the progress of a driveline product. The 6-speed Allison 1000 auto trans was now mated to the Duramax for the very first time. Previous years had only been available with a 5-speed version.
By adding one more gear ratio, the engine had lower RPM’s on the highway, thus providing better fuel economy and cooling while hauling heavy loads.
The mechanical upgrades allowed GM to safely crank up the power straight from the factory floor.
| Feature | Specification |
|---|---|
| Production Years | 2006,2007(early) |
| Configuration | 6.6L V8 Turbo Diesel |
| Horsepower | 360 hp@3,200 RPM |
| Torque | 650 lb- ft@ 1,600 RPM |
| Fuel System | High-Pressure Common Rail via Bosch CP3 Pump |
| Turbocharger | Garrett Variable Geometry Turbo (VGT) |
| Transmission | 6 Speed Allison 1000 Automatic |

If you’re looking for a used LBZ, several common issues can crop up:
The LBZ uses a factory water pump that has a plastic impeller. After years of use, the plastic will break and/or strip off the steel shaft of the water pump. When the water pump no longer pumps coolant properly, the engine will quickly overheat. The solution is to replace the plastic impeller with a welded steel impeller.
Factory transmission lines consist of a mixture of metal tubing and rubber hoses connected with crimped fittings, which deteriorate and leak fluid after going through numerous cycles of heat. Many owners choose to replace them with heavy-duty aftermarket braided lines.
The LBZ in its stock form is not known to crack pistons very often, but many owners exceed the limits of the stock block. If you load a heavy tune on these engines and exceed 600-650HP with stock internals, the cast aluminium pistons will likely crack due to excessive cylinder pressure.
A frequent problem with electricity occurs near the alternator bracket. The main engine wire harness can rub on the sharp metal edge. With time, vibration can wear away at the insulation. This creates electrical shorts, blown fuses, and intermittent engine diagnostic trouble codes.
GM offered trucks with mechanically identical engines but was sold with “detuned” maps from the factory during the beginning of 2006. This was also referred to as a “2006 LLY engine.” To know whether you have a true factory full-power original LBZ engine, you need to locate the 8th character of your vehicle’s VIN:
Always check the truck’s physical VIN plate on the driver’s side dashboard.
You can help ensure your 2006-2007 Duramax can run over 300,000 miles with just a few small modifications to an original, clean, and unmodified engine.
The CP3 high-pressure pumping system pulls the fuel from the tank entirely. It produces enough vacuum to introduce air into the fuel system. By adding a fuel lift pump (FASS or AirDog), you will be able to deliver consistently clean, pressurised fuel from the tank to the engine, preventing premature wear of your fuel injectors.
LBZ is equipped with an EGR valve to feed previously burned exhaust fumes back into the fresh air intake system. Over time, this leads to the accumulation of carbon and muck on the inside of your intake tract. Periodically cleaning and servicing your EGR system will help maintain a clear top end for your engine.
The factory steering tie rods on heavy-duty Silverado and Sierra chassis are known for being weak. They can be fairly thin and can easily bend when put under a lot of pressure. Upgrading to heavy-duty tie rod sleeves is a much cheaper alternative to strengthening the front-end steering assembly.
The 2006 and 2007 LBZ Duramax are legendary machines thanks to their heavy-duty engine block, 6-speed Allison Transmission, and tremendous tuning potential without the complex headaches of modern-day diesel emissions components.
A well-maintained LBZ is still one of the best investments you will ever make in a truck, despite their high market price and usually very high mileage.

The Cummins 5.9L inline-six diesel engine is a very well-known, extremely popular engine in the automotive world for its durability. This internal combustion engine produces a large amount of torque. The Cummins 5.9L has been around for many years and has been used in many applications, from heavy-duty Ram to agricultural machinery and custom swap projects.
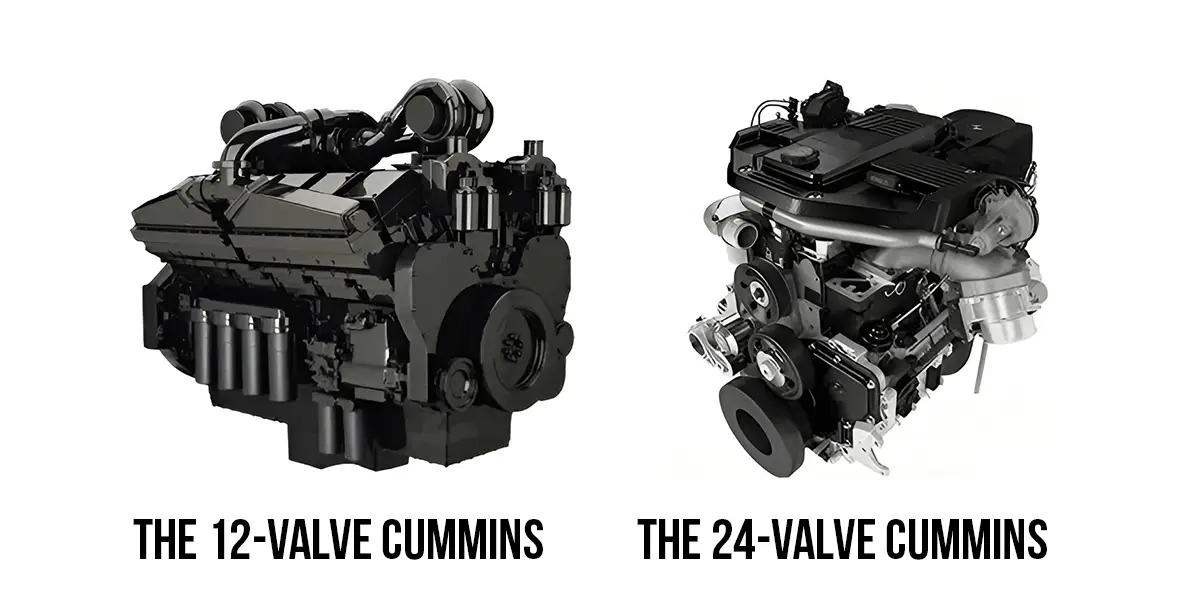
If you’re searching for a vintage diesel truck or are thinking about swapping out the engine, you will eventually find yourself wondering whether to use a 12-valve (12V) or 24-valve (24V) Cummins engine. Although both 12V and 24V engines share very similar blocks, they utilize vastly different fuel systems, cylinder heads, and electronic control systems.
This comparison guide outlines the differences in performance, reliability, modding potential, and common failures between 12V and 24V engines to help you make the best decision for your project.
It is helpful to know the background of both platforms and the progression in their design before examining the details of each.
| Feature | 12 Valve Cummins | 24 Valve Cummins |
|---|---|---|
| Production Years | 1989-1998 | 1998.5- 2002 |
| Valves Per Cylinder | 2 | 4 |
| Injection Pump | VE or P7100( Mech) | VP44( Electronic) |
| Brains/ Electronics | None(Fully Mech) | ECM Controlled |
| Stock Horsepower | 160-215 hp | 215-245 hp |
| Stock Torque | 400-440lb-ft | 420-505 lb-ft |

The 12-volt Cummins engine is well known in the diesel community. It is often referred to as the “holy grail” of diesel truck engines. As it has only two valves per cylinder and nearly all its operating functions are mechanical, it will continue to run if you provide it with air and fuel. No attachment with an electrical system or any type of computer (vehicle computer) is necessary for operation.
Models from 1994- 1998 all have the Bosch P7100 inline injection pump, also known as the “P-pump”. The P-pump is an incredible design that provides high volumes of fuel and withstands extremely high internal pressures. It is considered to be incredibly durable and easy to adjust.
There’s no ECM (Engine Control Module) in the 12V engine, so the combustion process is not being controlled by anything electronically. There are no complicated wiring harnesses to corrode, no sensors that can fail, and no software bugs to leave you stranded on the side of the road.
You do not have to pay for expensive software tuning programs to tune a P-pumped 12v. You can simply tune your diesel with basic hand tools by taking out your stock fuel plate, adjusting your star wheel, or putting in a 3000/4000 RPM governor spring kit. You can gain a lot of horsepower and torque in your driveway.
The 12-valve engine has amazing amounts of low-end torque from the moment you start driving. The design of the combustion chamber, combined with fixed timing of the fuel injections, allows for outstanding fuel economy in most cases. It often exceeds 20 miles per gallon on the highway with the correct gearing.
Although the 12v has great reliability, there is one main mechanical defect. A small steel dowel pin misaligned in the timing gear case at the factory could loosen and fall into the spinning timing gears due to engine vibration.
If the dowel pin falls into the rotating timing gears, it could either crack the housing or destroy your entire engine. Fortunately, there are inexpensive aftermarket kits for permanently fixing this issue, called KDP tab kits.

The new 24v Cummins engines were added during the middle of the 1998 model year in order to comply with new 1998 Federal EPA emission standards. With the addition of two valves, they were also going to use electronic fuel management, which improved airflow, reduced emissions, and also meant a smoother power band.
Since the head has 24 valves, it can flow much more air than the 12v head. Additionally, the injector is situated directly above the piston bowl; this leads to a better, more complete burn, quicker turbo spool-up, and increased horsepower at higher RPMs.
By connecting digital programmers, monitors, and chips to the data port of a 24-v with electronic controls, you can change your engine’s tune and fuel maps quickly and easily. You can plug an electronic throttle controller into the data port, tap into the pump wire, and then alter fuel maps instantly, select between different power levels, and monitor engine vitals.
One major flaw of the 24-v generation is the Bosch VP44 electronic gear-operated injection pump. The all-in-one VP44 uses only diesel fuel for its cooling and lubrication needs. If the factory fuel lift pump fails or there is a drop in fuel pressure below 10 PSIG, then the VP44 will run hot and fail. In that case, you will have an expensive replacement.
24-v engines manufactured between 1999 and 2001 had a block manufactured from cast iron and stamped with “53”. The blocks have thinner water jacket walls, which may crack if the engine is subjected to heavy towing loads or thermal stresses, or the water jacket area may leak coolant from the engine.
For high-performance diesel truck builds, each platform presents multiple options for upgrades.
The 24-v Cummins has a good chance of being competitive at this power level. With a solid electronic tuner, higher-flowing fuel injectors, a drop-in turbo, and a dependable aftermarket lift pump, you can achieve 450+ horsepower with no tools and no wrench turns required under the hood.
The 12-v Cummins with a P7100 injection pump builds high-horsepower trucks. A VP44 injection pump will produce peak power at approximately 500-600hp, but with a P7100 injection pump, you can modify it to support 800, 1,000, and even 1,500+hp builds with multiple turbos.
With its superior airflow to 3,000 RPM when optimally tuned, the 24v can make much more power on its top end than the 12v engine. The 12v engine in a stock state defuels early in the RPM range (around 2500 RPM) and requires governor spring updates to provide more range.
Both engines regularly surpass 350,000 to 500,000 miles when properly maintained, but they require different approaches to keep them running smoothly.
| Maintenance Metric | 12-Valve | 24-Valve Cummins |
|---|---|---|
| Fuel System Upgrade | Stock lift pump is highly reliable; requires minimal modifications | Requires an immediate aftermarket lift pump (e.g., FASS or AirDog) to protect the VP44 |
| Valve Adjustments | Required every 24,000 miles; simple adjusters with 12 valves | Required every 100,000 miles; requires a bit more time due to 24 valves and bridge adjusters. |
| Electrical Failures | Very rare. No critical engine sensors or control computers to fail. | Sensor failures( Crank/ Cam position, MAP, APPS )can trigger limp mode. |
| Fixed to Prioritise | Killer Dowel Pin (KDP) lock kit must be installed | Monitor fuel pressure constantly using a dedicated gauge. |
The choice between a 12v and 24v Cummins depends on your budget, mechanical experience, and performance goals.
Both 5.9L Cummins engines are great options in the diesel vehicle market. Whichever of these vehicles you decide to buy, you should address the factory defects to have dependability for the life of the vehicle.

The LB7 Duramax (2001–2004) established General Motors as a significant force in the diesel world. The 6.6L V8 engine was produced through a partnership between GM and Isuzu. It replaced the old 6.5L Detroit Diesel engine, providing GM a basis to compete with both Ford and Dodge in the heavy-duty truck market.
Many enthusiasts consider the LB7 to be the “holy grail” of early Duramax diesel engines. It was the last of its generation to be manufactured without complicated emissions controls, such as EGR and DPF.
The LB7, a product of modern engineering skill, was developed and introduced in 2001. The vehicle utilizes a new type of fuel injection system with a common rail that works at higher pressure than standard diesel injection systems available at that time. These new improvements created a quieter engine with greater fuel metering accuracy than conventional diesel technology at the time.

The LB7 engine is durable but can have issues, especially if you’re buying a used truck or maintaining one you already own. Below are some key indicators to watch for.
The LB7’s most common problem is when its internal fuel injectors fail. On other models, these injectors are installed above the valve covers. As a result, when injectors leak fuel into the crankcase, the oil will thin out, which could lead to an engine failure. When this happens, it is important to replace it.
Symptoms of Injector Failure:
Solution: Replace all 8 injectors with updated Bosch units. Install an aftermarket lift pump such as AirDog or FASS, which not only improves fuel filtration but also eliminates air pockets from the fuel.
As time passes, the O-rings inside the factory fuel filter housing can dry out or crack. This can let air enter your fuel system, which will cause your engine to lose its prime or run poorly.
The Fix: Purchase a cheap rebuild kit to replace the seals, or upgrade to a complete aftermarket housing.
The 2002 Chevrolet Silverado 2500HD/3500HD featuring the 6.6L LB7 Duramax engine is known for its capability and dependability. It is widely regarded as an icon of high-performance “pre-emissions” diesel trucks.
It was the first model year (2001) of the GMT800 HD platform to include the Isuzu-developed Duramax V8 (6.6 L) and heavy-duty Allison 1000 5-speed automatic transmission.
An example of a 2002 LB7 with low rust and verifiable maintenance would generally sell for between $7,500 and $13,000, depending on mileage and condition. Many enthusiasts believe that you should look for a vehicle that has already been updated to SAC injectors.
Enthusiasts often regard 2003 as an exceptional year for the first generation of 6.6 L diesel engines.
The performance specs remained identical to those of 2002. However, the model year saw several electrical and interior enhancements, making the 2003 LB7 more appealing to current-day drivers than previous models.
The 2003 LB7 Duramax is also one of the “best” years, according to many enthusiasts. The engine produced 300 horsepower and 520 lb-ft of torque.
Electrical Architecture: In 2003, an entirely new electrical system was designed for GM pickup trucks. Newly introduced components were steering wheel controls, a more sophisticated Driver Information Center (DIC), Bose audio & XM radio.
Interior Styling: The interior received a new look with an updated dashboard and additional changes to materials and layout detailing.
Reliability “bugs”: Most issues with small assembly and component manufacturing flaws that existed in the models from 2001 were generally resolved by model year 2003. Still, all generations of this product suffered from many major engine problems.
One of the factors that makes LB7 popular is the fact that it is effortless to tune. Therefore, simple bolt-on mods can lead to an enormous amount of power. It is due to the absence of emissions equipment that restricts the engine’s airflow.
EFI Live is the leading choice for Duramax performance and provides custom maps specifically for your truck.
Benefits:
Note: The stock Allison 5-speed transmission will typically handle roughly 60-90 hp more than stock. At that point, you’ll need to look for a “built” transmission upgrade.
Many car owners are using ram-air systems or cold-air intakes instead of using the factory air intake. Using an exhaust system that has a 4-inch “turbo-back” along with either of those two intakes will reduce EGTs and help you get more life out of your engine while pulling.
Although the IHI stock turbo is dependable, upgrading to a larger drop-in turbocharger or the use of a Batmowheel will yield greater boost during the mid-range. It will increase efficiency for heavy-duty trucks.
Choosing the right Duramax generation depends on your goals. Here is how the LB7 stacks up against its successors:
| Feature | LB7 (2001-2004) | LLY (2004-2005) | LBZ (2006-2007) |
|---|---|---|---|
| Emissions | No EGR/No DPF | Early EGR | Early EGR |
| Injectors | Internal | External | External |
| Turbo | Fixed Geometry | Variable | Variable |
| Transmission | 5-Speed Allison | 5-Speed Allison | 6-Speed Allison |
Proper maintenance of the LB7 engine will yield extremely high fuel economy.
There’s no doubt the LB7 Duramax is still considered one of the best diesel engines ever produced. Its internal injector design can lead to costly repairs, but it lacks the added complexity of newer models.
This simplicity makes this a great truck for someone who appreciates good fuel economy and easy mechanical repairs and has a desire to do thorough tuning. The 2001-2004 Duramax is not just a work truck; it is the best possible long-term investment as a truck owner.
With a quality lift pump and updated injectors, you will not be driving a piece of diesel heritage; you will be driving a truck that can outlast any of the newer trucks.


The 6.6L Duramax LMM is an iconic engine that changed the course of diesel development for GM. This engine was made from 2007 through mid-2010 and combines the heavy-duty build characteristics from the LBZ engine and the beginning of modern emissions regulations.
This blog will take you through all aspects of the LMM from performance to trouble areas. It will also highlight where the LMM fits in the Duramax engine family if you are looking for a 2007 or late-model 2010 Chevy Duramax.
The full history of Duramax engines is critical for understanding LMM. There are 6 variants of Duramax diesel engines established by GM. Beginning with the LB7 and increasing durability to the latest L5P, the previous models had a distinct design and performance characteristics:
The 2007 Duramax is different from other years because it was produced in two parts. Models built early in the year have the “Classic” body style and an LBZ engine, while those produced after mid-2007 have the newer GMT900 body style and an LMM engine. Many people want the most recent model year interiors, but they need to consider which emissions system is being used.
The LMM Duramax of 2008–2009 is known as the most refined of this generation of Duramax. It had a very comfortable interior and a bulletproof Allison 1000 6-speed transmission to go with it. The LMMs were the standard for heavy-duty towing, delivering 365 HP and 660 ft-lb of torque.
The LMM was the last Duramax before the introduction of the LML in 2011. Many enthusiasts choose an LMM model because it was the last Duramax to use a Bosch CP3 fuel injection pump, as well as not requiring DEF. It is easier to maintain compared to the following generations.
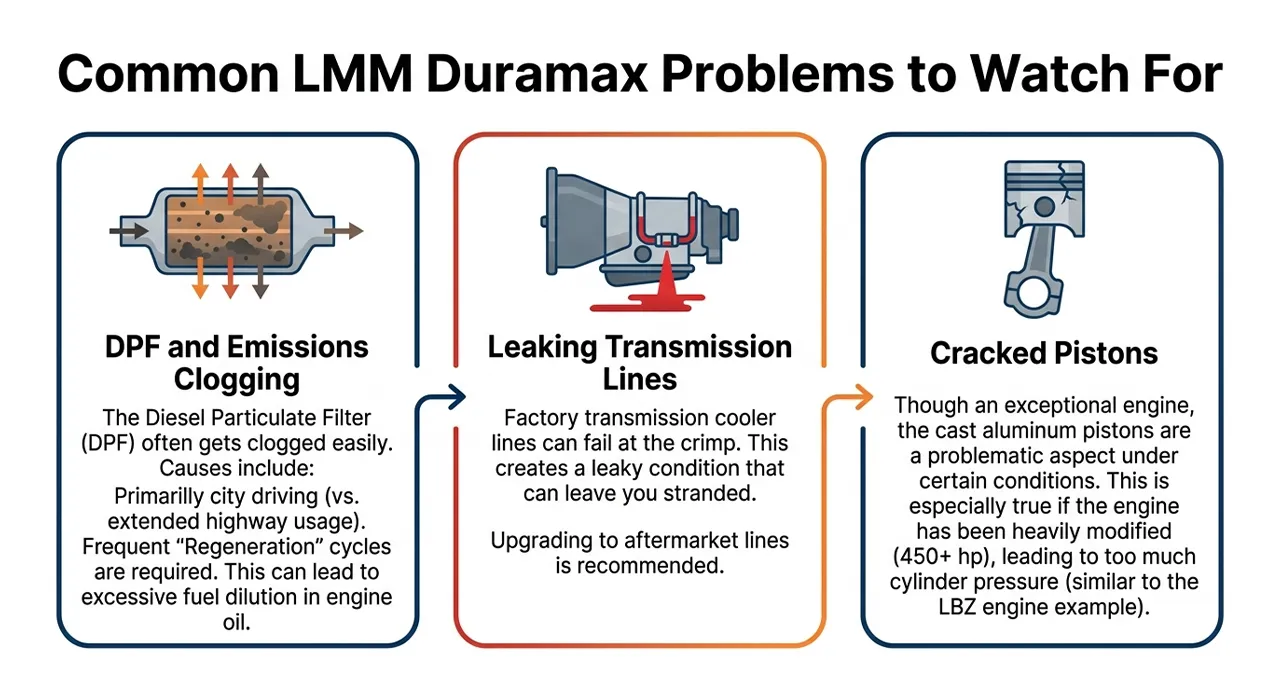
The Diesel Particulate Filter (DPF) seems to be one of the largest problems associated with the LMM Duramax engine. The DPFs tend to get clogged easily, especially if the truck primarily drives in the city rather than on extended highway routes. Additionally, the DPF in LMM Duramax engines will require frequent “regeneration” cycles, which can contribute to excessive fuel dilution in engine oil.
Transmission cooler lines from the factory have been known to fail at the crimp, which creates a leaky condition. When such an event happens, you’ll get stranded unless you upgrade to aftermarket lines.
An LMM is an exceptional engine; the pistons, due to their cast aluminum construction, can often be the most problematic aspect. It is heavily modified and produces large amounts of horsepower.
An example of this performance is the LBZ engine, in which pistons are susceptible to cracking under too much cylinder pressure if the engine has been modified aggressively (450+ hp).
When experts rate the best years for Duramax engines, the LMM often ranks among the best.
Here are a few community best practices that can help you keep your LMM running past 300,000 miles, from those who have tried and recommend them.
If you can handle the early emissions hardware, a 2008-2010 LMM Duramax is an excellent platform for towing, driving to work, or building a high-performance vehicle. The LMM Duramax is a true hybrid, combining old-school power with the comfort of today’s vehicles.

Few names cause as much debate in the heavy-duty truck world as the Ford 6.4 Power Stroke. Navistar made this engine for Ford, and it is mostly found in the 2008 Ford F250 6.4 diesel and its F350/F450 siblings. They designed it to be a powerhouse. But it also marked the beginning of a new era of complexity that would change the diesel landscape forever.
If you are a current owner or considering a used 2008 F250 diesel, you need to understand the nuances of the 6.4L Power Stroke to survive.
The 6.4L Power Stroke was Ford’s answer to the controversial 6.0L and was introduced in 2008. Ford’s answer to tougher EPA emissions requirements is adding the diesel particulate filter (DPF) to the Super Duty range.
Under the hood, the 6.4 Powerstroke engine is a technological wonder. It has a sequential twin-turbocharged setup that essentially eliminates turbo lag. It makes a huge 350 horsepower and 650 lb-ft of torque available right off the showroom floor. It was different from its predecessor in that it used a high-pressure common-rail fuel system with piezoelectric injectors, which meant it could be quieter and deliver fuel more precisely.
If you’re looking into 6.4 Power Stroke years to avoid, unfortunately, the answer is a bit more complicated. The engine was only produced for three model years, 2008, 2009, and 2010.
So technically, the 2010 models had the fewest amount of “growing pains.” But all three years have the same basic design. The 6.4 Powerstroke reliability was inconsistent throughout its life; the production run was so short. Most enthusiasts agree that if you buy one today, the maintenance history is far more important than the particular model year.
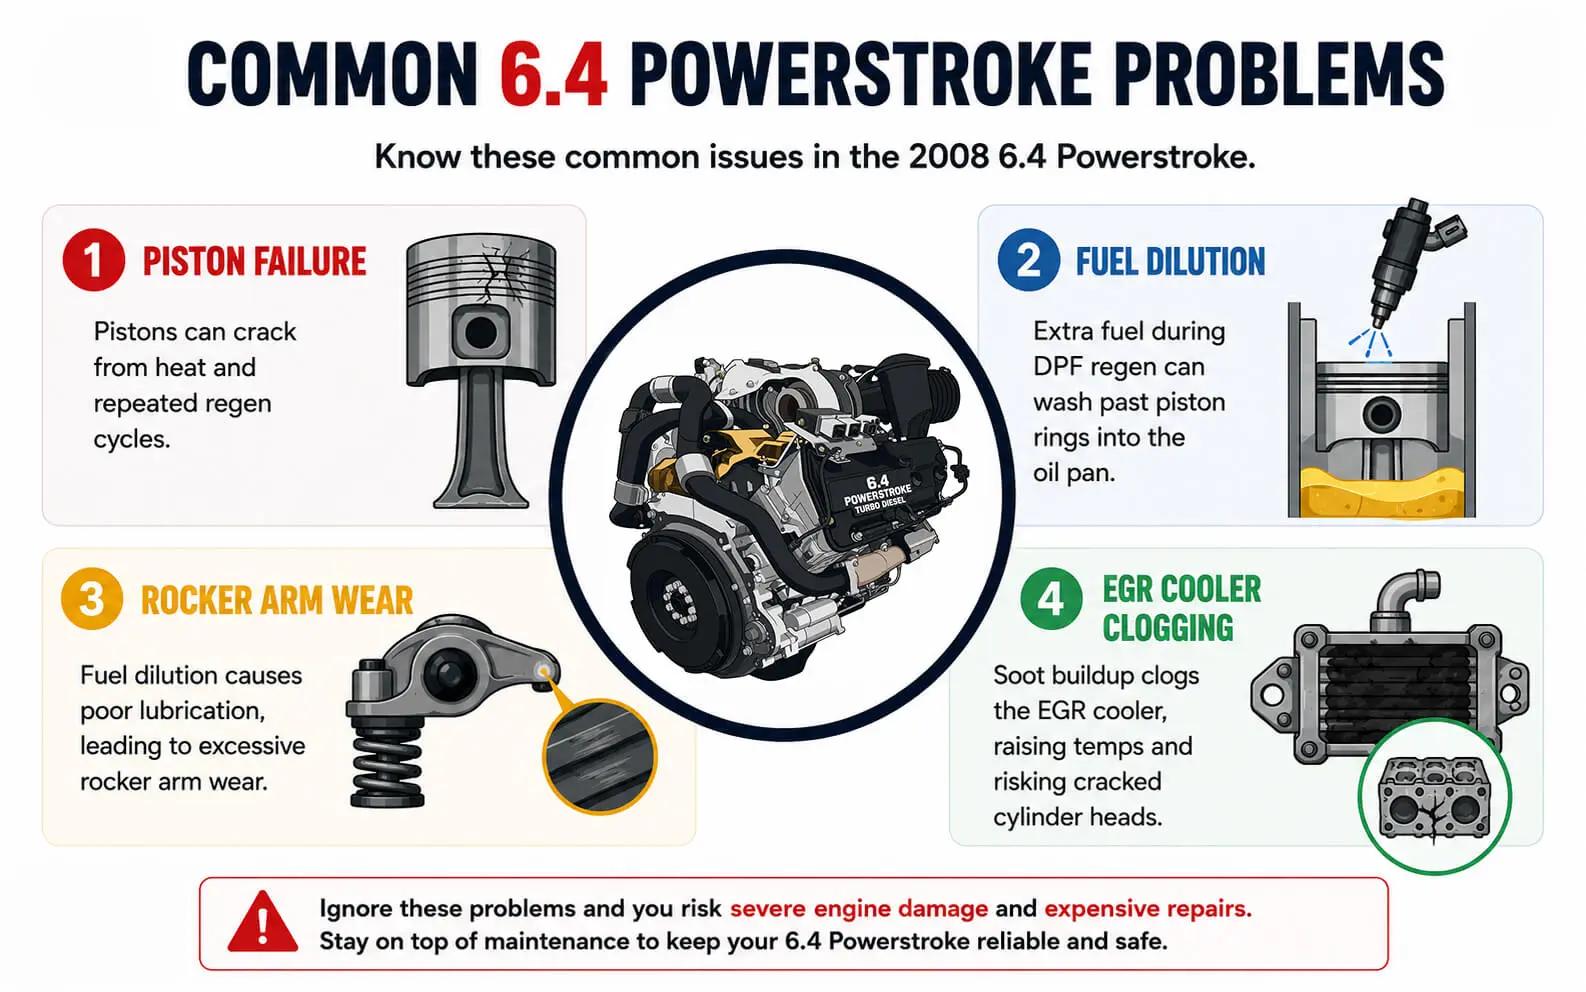
One can easily be fooled into a false sense of security, given the enormous towing capacity of the 6.4 Powerstroke. Still, 6.4 Powerstroke problems are so extensive that they are downright dangerous if not addressed. If you own a 2008 6.4 Powerstroke, be aware of what comes next:
Due to the fuel dilution problems, you have to realize that maintenance makes the 6.4 Powerstroke reliable. You simply cannot run this truck like a gasoline engine; you have to be disciplined. The Powerstroke uses 15 quarts (3.75 gallons) of oil in the 6.4 L Powerstroke.
Though the brochure recommends longer mileage intervals than what is typically used, most diesel mechanics advise changing the oil after 5,000 miles or sooner if the engine is frequently in “regen” mode. You should use a top-notch 15W-40 or 5W-40 synthetic diesel oil.
Desperate for the longevity and durability of a 6.4 Powerstroke, you might think, “Why doesn’t everyone buy one?” The key point is performance. The 6.4L Powerstroke is generally considered the easiest diesel engine to make insane power with. With a cheap electronic tuner, exhaust system, and maybe a pipe on the intake, these trucks will go from running 350hp to well over 500hp. The monster midrange torque of the compound turbos, and these trucks become a favorite for the sled pulling and heaviest highway towing jobs out there, so long as their internals don’t give in.
So, is the 6.4 PowerStroke motor a “ticking time bomb”? Not really, but it is a “high-maintenance” motor. To maximize the life of your Ford 6.4 Powerstroke, you must:
The 2008 6.4 Powerstroke is a somewhat exclusive period for Ford. This phase was a basic transitional period between the old-school diesel tech and the current 6.7L Scorpion engine. Comfort- and reliability-wise, the 6.4 Powerstroke is no legend, but it is known for power.
If you are researching a 2008 Ford F-250 6.4 diesel, go in with your eyes wide open. The 6.4 is amazing on the highway if you have fresh oil, a clean fuel system, and monitored gauges.

Diesel enthusiasts still debate the merits of the 6.0L Powerstroke engine as one of the most debated powerplants in diesel history. They love how much power the engine produces, but hate the common issues that plague the underperforming engine due to specific flaws in the high-pressure oil system. At the center of this system—and often at the center of a “no-start” headache—is the High-Pressure Oil Pump (HPOP).
This article is a comprehensive look at the 6.0L HPOP, including its operation, failure symptoms, and the most common repair methods.

The 6.0L Powerstroke employs HEUI (Hydraulic Electronic Unit Injection) as its method of fuel injector activation. A common-rail diesel fires its fuel injectors by means of a mechanical camshaft and only from high-pressure fuel. The HEUI system employs both high-pressure oil and a plunger activated by high-pressure oil to fire the injector.
The HPOP is the component responsible for pumping this oil.
It increases the pressure of normal engine oil from approximately 50 psi to between 500 and 4,000 psi.
As the high-pressure oil flows through the HPOP and enters the injector, it creates enough pressure on the plunger within the injector to force a large amount of atomized fuel into the combustion chamber. If the HPOP cannot provide at least 500 psi of oil pressure into the injector, the injector will not fire.

Ford revived the HPOP design during the production process, creating two separate types of pumps with significantly different rates of failure:
HPOP problems typically give you some kind of warning before they leave you stranded. Consider monitoring your HPOP if you see these indicators:
Before spending $800 on either a pump or 10 hours of labor, you need to verify the failure with a digital monitor (such as an Edge Insight or Forscan). Also, you should check three specific PIDs:
Should be at least 500 PSI before the engine will run.
Should be between 0.8V and 1.0V during engine start-up.
This indicates how much pressure the computer is putting on the valve to hold pressure. If during cranking the IPR is at 85% and the ICP is 200 PSI, then you have a major leak or no fuel pump.
The HPOP is located underneath both the turbo and the intake manifold area, so it will be impossible to guess its location. An air test should be conducted by injecting shop air through the ICP sensor port while manually closing the IPR valve.
When replacing the HPOP, it is recommended that you do not put it back together with factory-style “weak links”.
For 2005 – 2007 trucks, replace the two-piece “snap” fitting with the one-piece solid threaded update kit. This is a permanent fix.
Always check the screen on your IPR valve(s). If the IPR screen is torn or has metal chips in it, then your HPOP is most likely “grenading” internally.
While the turbo is off for access to the HPOP, replace them with the updated versions, which have Teflon backup rings.
HPOP Systems with the 6.0L Powerstroke have complex characteristics. These systems have become no longer mysterious due to the extensive research and development of aftermarket and OEM components, along with upgrades to create a complete HPOP System. Due to updated components such as the new one-piece STC fitting and redesigned standpipes, High Pressure Oil Systems can now be as reliable as any diesel engine on the market. Using proper oil, Ford (Motorcraft) filters, and checking ICP and IPR values will ensure the reliability of the system.

If you see white smoke coming out of your car’s exhaust system and/or the temperature gauge is in the red zone, it is likely your worst fear has become a reality – you have blown your head gasket. Traditionally, this means a repair bill upwards of $1,000 to $3,000.
However, what has become increasingly popular with many drivers is an inexpensive alternative: a head gasket sealer.
So, is there really a bottle of liquid that can repair a mechanical problem? In this article, we will take an in-depth look at how these types of products work, when they can save your life (or your vehicle), and when they should absolutely not be used.
A head gasket sealer is a specialized product that works through the engine’s cooling system to find and seal leaks in the head gasket. The majority of quality sealers should contain sodium silicate (better known as “liquid glass”) along with different types of reinforcement materials/such as carbon fiber or brass particles, etc.

Upon entering the radiator, the sealant follows along with the cooler. Once it reaches an area of high heat, typically the crack or gap in the head gasket where combustion gases are escaping, the extreme heat and pressure cause the chemical to harden. This forms a fiberglass or ceramic-type material, which can resist the extreme environment produced when the cylinder fires.
Not every engine failure can be fixed with a bottle. Understanding the limitations of these products is key to not wasting your money or further damaging your car.
Sealers work best on “seepage” or very small cracks. For example, if your car is only leaking coolant a little each week or if you see early signs of steam emissions from the tailpipe (white smoke), then using a sealer such as Steel Seal or BlueDevil may fix your problem for a long time to come.
A few examples of when to use these sealers include:
If your vehicle is 15 years old and worth $2000, spending $2500 for a head gasket replacement costs more than your vehicle is worth. Therefore, you would likely benefit more from purchasing a $50 – $100 bottle of K-Seal or Bar’s Leaks to help extend the life of your vehicle.
Your choice of the “best” head gasket sealer comes down to how bad your leak is, how comfortable you are working on cars, and what you can afford to spend. Therefore, based on expert reviews and manufacturer product specs for 2026, below are the best recommendations:

Proper application is the difference between a fixed engine and a ruined radiator. While every brand is different, most professional-grade sealers follow this general workflow:
For the next five years, if your car is a “daily driver” and you will own it long enough, as long as it’s a newer engine, it would be recommended to make a mechanical repair at a trusted repair facility like Your Local Mechanic. This would be the best investment.
If you’re having an emergency and/or are on a limited budget, or you’re driving an older vehicle that doesn’t have enough value to justify the substantial investment required for mechanical repairs, the use of a head gasket sealer would be your best bet in a “Hail Mary” situation. It’s scientifically verified and more successful than most people think.

In a vehicle’s engine bay, the fuel pressure regulator (FPR) is one of the least noticed components. Although it is small, it is the “gatekeeper” of your fuel system because it regulates the exact amount of fuel your engine needs – no more, no less – in every driving condition. When this crucial element starts to go bad, it can cascade into performance issues that look just like larger, much more expensive engine failures.
Being able to recognize the symptoms of a bad fuel pressure regulator is critical for any vehicle owner looking to minimize unnecessary repair costs and keep their vehicle running in optimal condition.

A fuel pump sends gas to a fuel rail in a fuel-injected engine. The pressure regulator on that fuel rail (for most traditional systems) contains a diaphragm, which is controlled by both a spring and the amount of vacuum in the intake manifold.

There are usually two ways that a regulator fails: either stuck open (causing low pressure /lean condition) or stuck closed (causing high pressure/ rich condition).
The “Smoking Gun”: Gasoline in the Vacuum Hose:-
This is the most definitive indicator of a failed regulator.
What happens? The internal rubber diaphragm ruptures.
Result: Raw fuel is drawn directly from a vacuum line into the intake manifold, bypassing the injectors altogether.
How to test: Pull a vacuum hose off the regulator while the engine is off. If you see fuel dripping or smell raw fuel in the vacuum hose, the regulator is 99% likely the issue. No fuel is injected.
Black Smoke from the Tailpipe:-
Coolant is typically white smoke, oil is typically blue smoke, and black smoke is the universal sign of a “rich” air-fuel mixture (too much fuel).
When the regulator fails, the pressure is too high, causing the injectors to over-flood the combustion chamber with way too much fuel to be burned efficiently.
Engine Misfiring and Rough Idle:-
When your vehicle stumbles at stop signals or vibrates significantly, the air-fuel mixture is unbalanced. A misfire happens because the spark plug cannot ignite a mixture of too much fuel (wet) or too little fuel (dry).
Significant Decrease in Fuel Economy:-
You might be fueling much more than usual without any apparent reason (i.e., constant driving speed) if your fuel regulator is stuck in the closed position.
Difficulty Starting (or Fails to Start):-
An engine needs to have a precise supply of fuel pressure to start. When you try starting an engine:
Some indicators that point to an issue are less apparent and take some investigative work to uncover:
Sooty Spark Plugs: If you pull out a spark plug and see that it has a thick layer of black powder on it, this means the vehicle has been running with too much fuel for quite some time.
Fuel Smell on Oil Dipstick: When there is an extensive ruptured diaphragm, the fuel can leak into the engine oil by going past the piston rings and contaminating it. You will know you have fuel in your oil when you smell the gas odor on the dipstick.
Noisy Fuel Pump: If the regulator becomes stuck in the closed position, it puts additional strain on the fuel pump to deliver fuel due to the pressure in the system. This results in a loud humming sound coming from the rear of the vehicle.
Many do-it-yourself enthusiasts misidentify a malfunctioning regulator as an inoperative fuel pump.
The Difference: A defective pump will typically only create low fuel pressure in comparison to a defective regulator, which can generate either high or low fuel pressure.
The Test: Because of this confusion, using a Fuel Pressure Gauge confirmed which component is faulty. If your pressure is above the manufacturer’s PSI range, then your fuel pressure regulator has failed,d regardless of whether your fuel pump has also failed.
A failing fuel pressure regulator is not something that you can afford to let go unattended:
Engine Damage/Overheating – An engine running “lean” (too much air to fuel), due to the fuel pressure regulator delivering insufficient fuel, will cause engine knocking/pinging. If persistent enough, it will destroy the pistons.
Catalytic Converter Failure – Conversely, if the fuel pressure regulator is not functioning properly and provides too much fuel to the combustion chamber (rich), there will be excess fuel dumped into the exhaust. This excess fuel will saturate the hydrocarbons in the exhaust and can destroy your expensive catalytic converter.
Engine Performance/Safety – When the fuel pressure regulator malfunctions, you can expect inconsistent performance of the engine, stalling, stumbling, and loss of power when under load. All of these can put you at risk when driving.
Fuel Leaks/Fire Hazard – If a diaphragm inside the fuel pressure regulator is damaged, it may result in a fuel leak into the vacuum line and/ or a strong gasoline smell, as well as major running issues and a potential fire hazard.
Fuel Pump Wear – A faulty fuel pressure regulator can require the fuel pump to overwork, which will quickly wear out the fuel pump.
A failing fuel pressure regulator can be an issue, but it also causes much larger issues throughout your entire engine. Your fuel economy will suffer, and you may also cause harm to your catalytic converter if you do not address the black smoke in your exhaust or the rough idle.
The costs associated with ignoring a failed fuel pressure regulator are often higher than replacing the fuel pressure regulator itself. If you begin to notice a decrease in performance from your vehicle, start with the vacuum line. This is the quickest way to determine if you have a “gatekeeper” who has failed to do their job and help keep your vehicle running efficiently.

The Powerstroke 7.3L is known for its unimaginable durability, but the High Pressure Oil Pump (HPOP) is the heart of this rugged engine. There are many aspects of the HPOP every Ford owner should know.
With a typical diesel engine, there are mechanical pumps for delivering fuel into the engine. However, the 7.3L Powerstroke uses a HEUI (Hydraulic Electronic Unit Injection) system that accommodates the HPOP.
With HPOP, engine oil must be under pressure to open and close the fuel injectors. If the HPOP fails, the powerstroke will no longer run properly or will not run at all.
The purpose of this document is to provide information on how the HPOP works, its failure, and what type of upgrade paths are available for your Ford Powerstroke 7.3L.
The HPOP, positioned at the back of the fuel bowl in the engine valley, is a fixed-displacement, high-pressure axial piston pump. This pump is powered by a gear attached to the camshaft and retrieves its lubrication from a separate tank.

The HPOP is a device that produces the hydraulic pressure required to keep the injectors firing. In general, this type of device will last for 150,000 to 200,000+ miles.
Some common indications of a failing HPOP are:

A stock replacement pump may not provide enough fuel if your existing pump is lagging, or you installed larger injectors than the OEM specs.
Whether you want to replace your stock HPOP (High Pressure Oil Pump) or increase performance, you have some great options:

Changing an HPOP may seem daunting, but it is actually possible on your own. Just remember that you will need to be patient with the project and give it a good amount of time to complete.
Whether you are restoring a work truck or building a 500-horsepower street machine, the HPOP is the basis for the performance of your Powerstroke 7.3L. By changing the oil on a regular basis with clean 15W-40 oil and performing regular maintenance on your HPOP, you can maintain your Powerstroke’s reputation.
The 7.3L High-Pressure Oil Pump (HPOP) is more than just another engine component—it acts like the heart of the engine, supplying the pressure needed for critical systems, especially the injectors, to function properly. Its performance plays a key role in how efficiently the engine runs.
The HEUI system in the 7.3L Powerstroke is valued for its durability and straightforward maintenance, making it a trusted setup among owners. However, when the HPOP starts to wear out, it can impact fuel economy, starting performance, and overall engine reliability.
If you notice signs of a failing HPOP, replacing it with a high-quality unit is a worthwhile investment that can restore performance. With proper maintenance—such as using fresh oil, changing filters regularly, and monitoring ICP pressure—the 7.3L Powerstroke can continue to deliver dependable service for many years.
